FastNetMon

Sunday, 30 April 2023

Yubikey ssh on Ubuntu 22.04

Today I did full fresh installation of Ubuntu 22.04 to migrate to new 2T NVME disk from Samsung as I had disk space issues with my old 500G drive. 

After installation I noticed that I cannot use my Yubikey for ssh auth as documented here

I tried to add Yubikey as auth source and it failed with pretty weird error:

ssh-add -s /usr/lib/x86_64-linux-gnu/opensc-pkcs11.so

Enter passphrase for PKCS#11: 

Could not add card "/usr/lib/x86_64-linux-gnu/opensc-pkcs11.so": agent refused operation

 This error can mean literally anything.

I've tried running ssh agent manually in foreground mode:

ssh-agent -d

And after that I saw error which sounds like "no available slots".

So I back to guide as I suspected that my Yubikey died and I've sued following command:

sudo ykman list --serials

WARNING: PC/SC not available. Smart card (CCID) protocols will not function.

ERROR: Unable to list devices for connection

1232134323

That's interesting and this error lead me to this bug and I got fix:

 sudo systemctl start pcscd

After that it worked just fine.

As long term fix you need to enable automatic start on machine boot: 

sudo systemctl enable pcscd

Sadly it's known Ubuntu bug


Thursday, 13 April 2023

Yubikey ssh and signing failed for RSA "PIV AUTH pubkey" from agent: agent refused operation

You may face this issue if you use ssh and Yubikey like covered in this guide

Previously I had to reboot machine to address this issue but I found nice trick to get it work.

Originally error looks like:
ssh server
sign_and_send_pubkey: signing failed for RSA "PIV AUTH pubkey" from agent: agent refused operation
root@xxx: Permission denied (publickey).

It may happen when you forgot to tap confirmation on Yubikey and it was just slow.

First attempt to fix it was to kill all ssh agent processes which may be run on system:

ps aux|grep ssh

odintsov   16493  0.0  0.0   7972  5820 ?        S    12:36   0:00 /usr/bin/ssh-agent -D -a /run/user/1000/keyring/.ssh

odintsov   16494  0.0  0.0 164340 11584 ?        SLl  12:36   0:00 /usr/lib/openssh/ssh-pkcs11-helper

odintsov   27798  0.0  0.0   7972  3848 ?        Ss   13:20   0:00 ssh-agent -s

odintsov   27801  0.0  0.0 164340 11572 ?        SLl  13:20   0:00 /usr/lib/openssh/ssh-pkcs11-helper

The best way to kill them is:

pkill ssh

After that we need to start ssh agent again:

eval `ssh-agent -s`

After that load Yubikey key to agent:

ssh-add -s /usr/lib/x86_64-linux-gnu/opensc-pkcs11.so

For last command I use fancy alias in ~/.bashrc:

alias ssh_add='ssh-add -s /usr/lib/x86_64-linux-gnu/opensc-pkcs11.so'

It's not clear why Yubikey fails that way. I think it has something to do with ssh-pkcs11-helper being stuck in operation to Yubikey hardware. 


Saturday, 8 April 2023

How to enable IPv6 on Google Cloud?

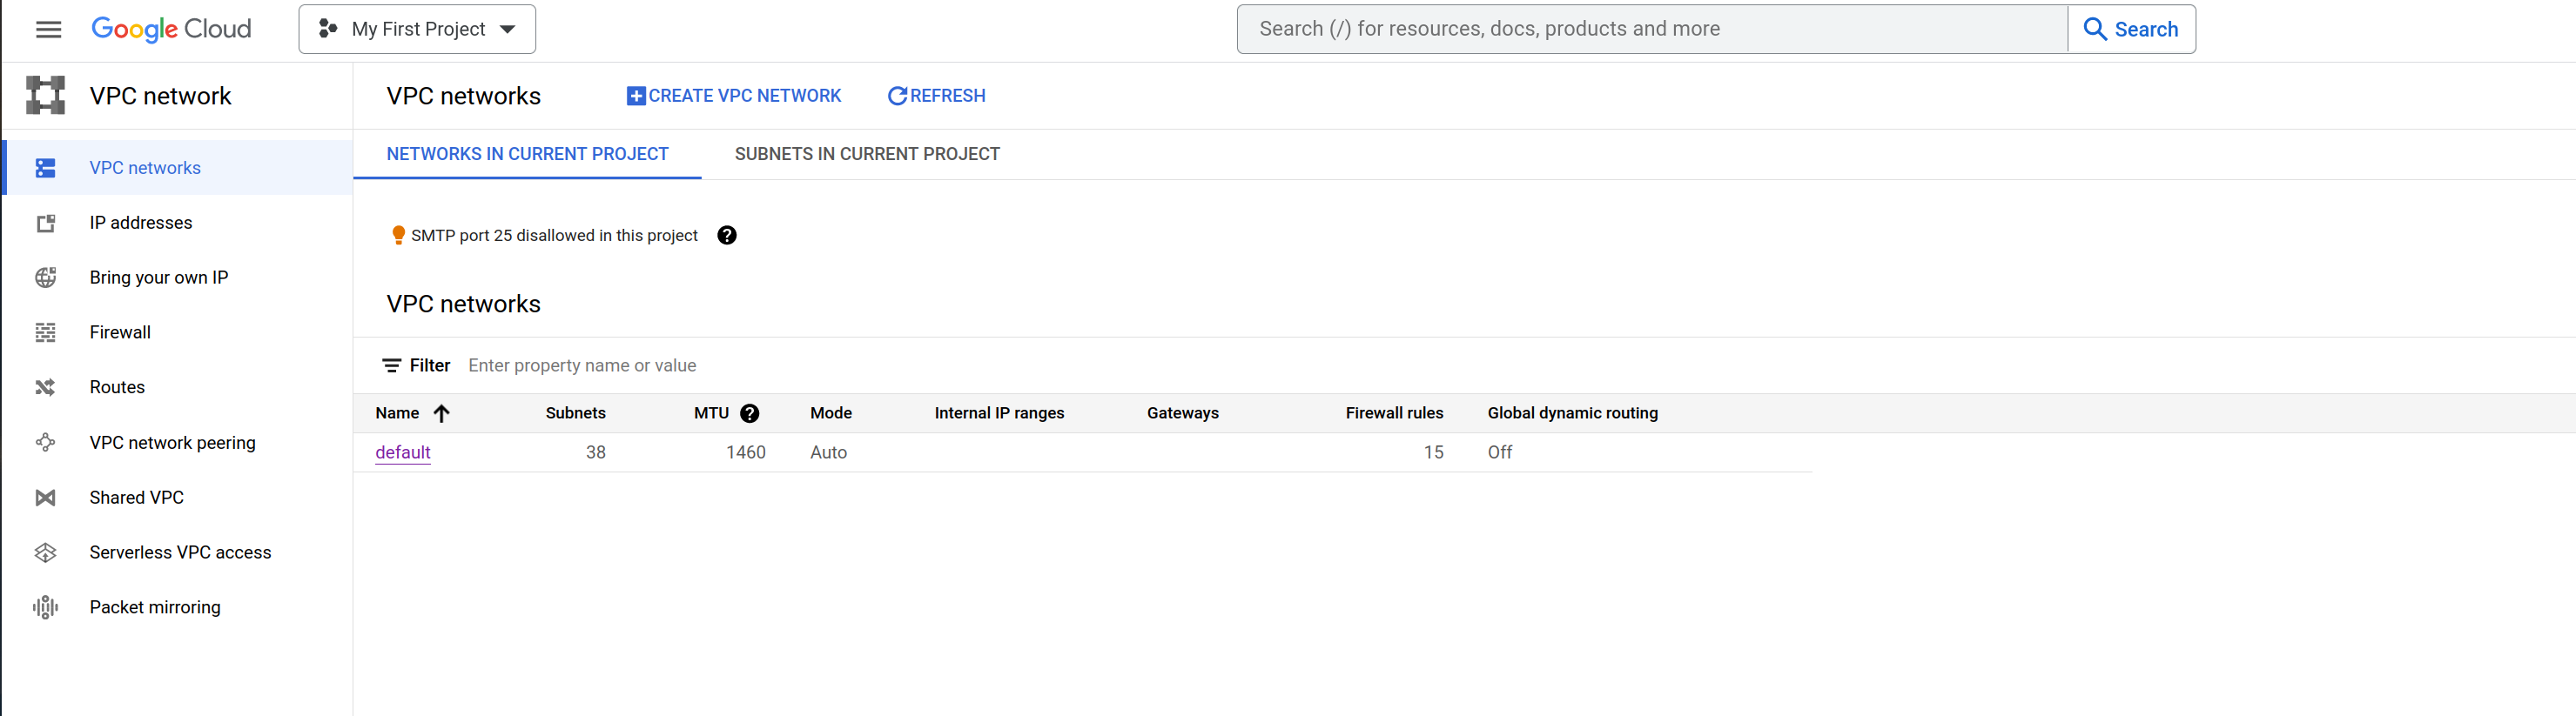
Google Cloud has native support for IPv6 but you need to create special VPC network to use IPv6.

As first step open VPC configuration:


Then create new VPC network and fill all fields as on my screenshot. 


Then configure subnet settings. The most important step to specify dual stack. 


Then you need to create default firewall rules to allow ICMPv6. You may notice that we use number 58 instead of ICMPv6 due to following issue:

Then enable ssh:

After these steps you can create new Compute instances in this region. Then you need to open advanced settings and select our new IPv6 enabled network in list:

And finally select dual stack:


The fun thing that you actually can disable IPv4 completely or you can allocate dedicated IPv6 address for machine. 

Pricing for IPv6 addresses even static ones is mostly free:


Sunday, 2 April 2023

Building log4cpp 1.1.4rc3 on msys2 environment on Windows Server 2022

 I got following error during my attempts to build lo4cpp in msys2 environment:

"../include/log4cpp/config-MinGW32.h:27:17: error: 'long long long' is too long for GCC"

It can be easily fixed by commenting following code in file include/log4cpp/config-MinGW32.h

// #define int64_t __int64 

I'll try to report this issue to upstream to have it fixed.  

Got this hint from this blog.

Enabling SSH server on Windows 2022 Datacenter edition

After friend's advice I realised that modern Windows versions have bundled SSH server and that's a best way to work with remote Windows platforms as RDP is not as cool as old good console.

First of all we need to install OpenSSH server component, you can do it this way:

  • Start
  • Settings
  • Apps
  • Apps and Features
  • Optional Features
  • Add Feature
  • OpenSSH Server
Then we need to start it. Search for "Services" in search panel and then open it. Looks for OpenSSH SSH server and then click right mouse button and Start it. 


Then open properties and switch startup type from "manual" to "automatic". We need it to launch it automatically on boot.


After that you can connect to this server via normal SSH client from Linux:
Based on this guide.


Wednesday, 1 February 2023

How to control RGB leds on Logitech G Pro X keyboard from Linux?

 Official software is coming only for Windows but fortunately we have nice project for it.

On Ubuntu or Debian it's very easy to install: 

sudo apt install -y g810-led

Then try setting this thing, it's my favourite one so far:

sudo gpro-led -p /usr/share/doc/g810-led/examples/sample_profiles/colors

Install it as default profile:

sudo cp /usr/share/doc/g810-led/examples/sample_profiles/colors  /etc/g810-led/profile 

Example:


Saturday, 28 January 2023

Using Radvd to advertise IPv6 prefix for NAT64

Some time ago I published article about my own NAT64 gateway and configuration for it was quite far away from perfect: 


It even looks ugly as you need to keep this prefix in mind all the time. IPv6 offers very nice way to announce such prefix from our NAT64 box automatically using RA / Router Advertisement announces.

To make it possible we need to install package:

sudo apt-get install -y radvd

Then we need to create configuration for it in file /etc/radvd.conf :

interface end0 {

    MinRtrAdvInterval 3;

    MaxRtrAdvInterval 5;


    AdvSendAdvert on;

    AdvDefaultLifetime 0;

    route 64:ff9b::/96 {};

};

With such configuration radvd daemon will advertise that this prefix is accessible via machine's IPv6 address and all hosts in network will be able to use it.  

You will need to replace end0 by name of your external interface of NAT64 box.

Then start it and enable autostart:

sudo systemctl enable radvd

sudo systemctl start radvd

Finally, reboot or disable / enable network on client machine.

To debug it from client I recommend installing this tool:

sudo apt install -y radvdump

Then you need to run application with same name:

radvdump

And after few seconds you will see banner like this:

interface enp37s0f0

{

AdvSendAdvert on;

# Note: {Min,Max}RtrAdvInterval cannot be obtained with radvdump

AdvManagedFlag off;

AdvOtherConfigFlag off;

AdvReachableTime 0;

AdvRetransTimer 0;

AdvCurHopLimit 64;

AdvDefaultLifetime 0;

AdvHomeAgentFlag off;

AdvDefaultPreference medium;

AdvSourceLLAddress on;


route 64:ff9b::/96

{

AdvRoutePreference medium;

AdvRouteLifetime 15;

}; # End of route definition


}; # End of interface definition

In same time your Linux routing table will receive following entry:
sudo ip -6 route|grep ff9
64:ff9b::/96 via fe80::8832:73ff:fe02:edb6 dev enp37s0f0 proto ra metric 100 pref medium
So we have nice network path towards our NAT64 prefix. That's very convenient and works just fine.

As final step I can recommend checking that some IPv4 host is accessible via IPv6 NAT64 prefix.

I've decided to try GitHub:

ping6 64:ff9b::140.82.121.3 -c 3

PING 64:ff9b::140.82.121.3(64:ff9b::8c52:7903) 56 data bytes

64 bytes from 64:ff9b::8c52:7903: icmp_seq=1 ttl=246 time=14.6 ms

64 bytes from 64:ff9b::8c52:7903: icmp_seq=2 ttl=246 time=14.1 ms

64 bytes from 64:ff9b::8c52:7903: icmp_seq=3 ttl=246 time=14.2 ms


--- 64:ff9b::140.82.121.3 ping statistics ---

3 packets transmitted, 3 received, 0% packet loss, time 2003ms

rtt min/avg/max/mdev = 14.145/14.305/14.574/0.190 ms

This approach highlights great deal of flexibility in IPv6 protocol as it was very easy to add new prefix for our own purposes inside of our own network. 

I used following articles as basis for my research one and two

In following release after 2.19 radvd will receive update which will make specific statement for NAT64 prefix announcements. 

Saturday, 21 January 2023

Realtek 8153 based USB Ethernet adaptor on Debian Linux

I received my Lenovo Ethernet USB 3 adaptor based on Realtek 8153 and it identified well on my PC:

4021.908466] usb 1-1: USB disconnect, device number 6

[ 4021.908858] r8152 1-1:1.0 enx606d3cece3ed: Stop submitting intr, status -108

[ 4023.337656] usb 1-1: new high-speed USB device number 7 using xhci_hcd

[ 4024.434537] usb 1-1: New USB device found, idVendor=17ef, idProduct=720c, bcdDevice=30.00

[ 4024.434542] usb 1-1: New USB device strings: Mfr=1, Product=2, SerialNumber=6

[ 4024.434543] usb 1-1: Product: Lenovo USB-C to LAN

[ 4024.434545] usb 1-1: Manufacturer: Lenovo

[ 4024.434545] usb 1-1: SerialNumber: ECE3ED000000

[ 4024.599450] usb 1-1: reset high-speed USB device number 7 using xhci_hcd

[ 4025.532652] r8152 1-1:1.0: load rtl8153a-3 v2 02/07/20 successfully

Sadly when I plugged it to my SBC RockPro64 I got following:

[ 4182.236792] usb 7-1: new high-speed USB device number 2 using xhci-hcd

[ 4182.386057] usb 7-1: New USB device found, idVendor=17ef, idProduct=720c, bcdDevice=30.00

[ 4182.386108] usb 7-1: New USB device strings: Mfr=1, Product=2, SerialNumber=6

[ 4182.386132] usb 7-1: Product: Lenovo USB-C to LAN

[ 4182.386152] usb 7-1: Manufacturer: Lenovo

[ 4182.386171] usb 7-1: SerialNumber: ECE3ED000000

[ 4182.440134] usbcore: registered new interface driver r8152

[ 4182.448147] usbcore: registered new interface driver cdc_ether

[ 4182.610609] usb 7-1: reset high-speed USB device number 2 using xhci-hcd

[ 4182.800168] r8152 7-1:1.0: firmware: failed to load rtl_nic/rtl8153a-3.fw (-2)

[ 4182.800868] firmware_class: See https://wiki.debian.org/Firmware for information about missing firmware

[ 4182.801738] r8152 7-1:1.0: firmware: failed to load rtl_nic/rtl8153a-3.fw (-2)

[ 4182.802385] r8152 7-1:1.0: Direct firmware load for rtl_nic/rtl8153a-3.fw failed with error -2

[ 4182.802401] r8152 7-1:1.0: unable to load firmware patch rtl_nic/rtl8153a-3.fw (-2)

[ 4182.839821] r8152 7-1:1.0 eth0: v1.12.13

[ 4182.880701] r8152 7-1:1.0 enx606d3cece3ed: renamed from eth0

To address it we need to add non-free repository to list of standard Ubuntu repos by adding non-free after main in /etc/apt/sources.list like this:

deb http://deb.debian.org/debian/ debian-code-name main non-free

And then install firmwares:

sudo apt-get update

sudo apt-get install -y firmware-realtek 

After that unplug USB adaptor and plug it again.

In my case I got following successful identification: 

[ 4778.769681] usb 7-1: new high-speed USB device number 4 using xhci-hcd

[ 4809.225536] usb 7-1: new high-speed USB device number 5 using xhci-hcd

[ 4809.374948] usb 7-1: New USB device found, idVendor=17ef, idProduct=720c, bcdDevice=30.00

[ 4809.375000] usb 7-1: New USB device strings: Mfr=1, Product=2, SerialNumber=6

[ 4809.375024] usb 7-1: Product: Lenovo USB-C to LAN

[ 4809.375044] usb 7-1: Manufacturer: Lenovo

[ 4809.375063] usb 7-1: SerialNumber: ECE3ED000000

[ 4809.570774] usb 7-1: reset high-speed USB device number 5 using xhci-hcd

[ 4809.738340] r8152 7-1:1.0: firmware: direct-loading firmware rtl_nic/rtl8153a-3.fw

[ 4809.760907] r8152 7-1:1.0: load rtl8153a-3 v2 02/07/20 successfully

[ 4809.790911] r8152 7-1:1.0 eth0: v1.12.13

[ 4809.831468] r8152 7-1:1.0 enx606d3cece3ed: renamed from eth0


Wednesday, 18 January 2023

spotifyd installation Ubuntu Linux 22.04

First of all, we need to install service which can play music from Spotify.

I'll use Spotifyd.

It's relatively easy to build as it uses Rust:

sudo apt install libasound2-dev libssl-dev pkg-config cargo
git clone https://github.com/Spotifyd/spotifyd.git
cd spotifyd
cargo build --release
Then you need to create basic configuration for it which includes login and plain text password. Create configuration folder:
mkdir ~/.config/spotifyd

Then open file with favourite editor:
vim ~/.config/spotifyd/spotifyd.conf

And then add following:
[global]
# Your Spotify account name.
username = "xxx@gmail.com"

# Your Spotify account password.
password = "xxx"

And finally launch daemon:

~/spotifyd/target/release/spotifyd --no-daemon 

Then you can see following log messages when you try to play music:

Loading config from "/home/xxx/.config/spotifyd/spotifyd.conf"

No proxy specified

Using software volume controller.

Connecting to AP "ap.spotify.com:443"

Authenticated as "xxx" !

Using Alsa sink with format: S16

Country: "GB"

Loading <Damascus> with Spotify URI <spotify:track:xxx>

<Damascus> (122880 ms) loaded

For production use I can recommend installing it to /opt:

sudo cp  ~/spotifyd/target/release/spotifyd  /opt/spotifyd

Then you will need to copy configuration file into system configuration path:

sudo cp ~/.config/spotifyd/spotifyd.conf /etc 

And creating systemd unit for it:

sudo vim /lib/systemd/system/spotifyd.service

With following content:

[Unit]

Description=A spotify playing daemon

Documentation=https://github.com/Spotifyd/spotifyd

Wants=sound.target

After=sound.target

Wants=network-online.target

After=network-online.target

[Service]

ExecStart=/opt/spotifyd --no-daemon

Restart=always

RestartSec=12

[Install]

WantedBy=default.target

And finally enable start on boot and start Spotifyd daemon:

sudo systemctl daemon-reload
sudo systemctl enable spotifyd
sudo systemctl start spotifyd

After that I can recommend checking that daemon started successfully using this command:

sudo systemctl status spotifyd

Example output:

spotifyd.service - A spotify playing daemon

     Loaded: loaded (/lib/systemd/system/spotifyd.service; enabled; preset: enabled)

     Active: active (running) since Wed 2023-01-18 14:13:11 GMT; 3s ago

       Docs: https://github.com/Spotifyd/spotifyd

   Main PID: 8963 (spotifyd)

      Tasks: 8 (limit: 4513)

     Memory: 976.0K

        CPU: 30ms

     CGroup: /system.slice/spotifyd.service

             └─8963 /opt/spotifyd --no-daemon


Jan 18 14:13:11 rockpro64 systemd[1]: Started A spotify playing daemon.

Jan 18 14:13:11 rockpro64 spotifyd[8963]: Loading config from "/etc/spotifyd.conf"

Jan 18 14:13:11 rockpro64 spotifyd[8963]: No proxy specified

Jan 18 14:13:11 rockpro64 spotifyd[8963]: Using software volume controller.

Jan 18 14:13:11 rockpro64 spotifyd[8963]: Connecting to AP "ap.spotify.com:443"

Jan 18 14:13:11 rockpro64 spotifyd[8963]: Authenticated as "xxx" !

Jan 18 14:13:11 rockpro64 spotifyd[8963]: Country: "GB"

Jan 18 14:13:11 rockpro64 spotifyd[8963]: Using Alsa sink with format: S16

After that you can install Spotify console client. If you see any errors from client then you will need to click "d" and select spotifyd as output device. 

The great benefits of SpotifyD that it exposes itself via native Spotify protocol and you will see it in your app from phone or another computer:


Sunday, 15 January 2023

CircleCI hardware: January 2023

I tried to find information about hardware used by CircleCI in Docker and Machine modes but failed to get any up to date information.

I'll focus only on largest resource classes available on Free / OSS plan. 

So I decided to use my own instances to get it. Docker Large.


Internally:

processor : 0

vendor_id : GenuineIntel

cpu family : 6

model : 85

model name : Intel(R) Xeon(R) Platinum 8124M CPU @ 3.00GHz

stepping : 4

microcode : 0x2006c0a

cpu MHz : 2999.998

cache size : 25344 KB

physical id : 0

siblings : 36

core id : 0

cpu cores : 18

apicid : 0

initial apicid : 0

fpu : yes

fpu_exception : yes

cpuid level : 13

wp : yes

flags : fpu vme de pse tsc msr pae mce cx8 apic sep mtrr pge mca cmov pat pse36 clflush mmx fxsr sse sse2 ss ht syscall nx pdpe1gb rdtscp lm constant_tsc arch_perfmon rep_good nopl xtopology nonstop_tsc cpuid aperfmperf tsc_known_freq pni pclmulqdq monitor ssse3 fma cx16 pcid sse4_1 sse4_2 x2apic movbe popcnt tsc_deadline_timer aes xsave avx f16c rdrand hypervisor lahf_lm abm 3dnowprefetch invpcid_single pti fsgsbase tsc_adjust bmi1 hle avx2 smep bmi2 erms invpcid rtm mpx avx512f avx512dq rdseed adx smap clflushopt clwb avx512cd avx512bw avx512vl xsaveopt xsavec xgetbv1 xsaves ida arat pku ospke

bugs : cpu_meltdown spectre_v1 spectre_v2 spec_store_bypass l1tf mds swapgs taa itlb_multihit mmio_stale_data retbleed

bogomips : 5999.99

clflush size : 64

cache_alignment : 64

address sizes : 46 bits physical, 48 bits virtual

power management:

According to specs this runner allows you to use 4 CPU cores and 8G of memory.


I can clearly see that it can use all 4 CPU cores:


Physical machine is not very overloaded from my perspective but it's clearly busy:


 Let's talk about Machine executor "Linux Large" which is VM.

This one has same number of CPU cores but has more memory:

Considering same cost of Docker Large and Machine Large (20 credits) Machine option looks more attractive.

CPU:

processor : 0
vendor_id : GenuineIntel
cpu family : 6
model : 106
model name : Intel(R) Xeon(R) Platinum 8375C CPU @ 2.90GHz
stepping : 6
microcode : 0xd000331
cpu MHz : 2899.970
cache size : 55296 KB
physical id : 0
siblings : 4
core id : 0
cpu cores : 2
apicid : 0
initial apicid : 0
fpu : yes
fpu_exception : yes
cpuid level : 27
wp : yes
flags : fpu vme de pse tsc msr pae mce cx8 apic sep mtrr pge mca cmov pat pse36 clflush mmx fxsr sse sse2 ss ht syscall nx pdpe1gb rdtscp lm constant_tsc rep_good nopl xtopology nonstop_tsc cpuid aperfmperf tsc_known_freq pni pclmulqdq ssse3 fma cx16 pcid sse4_1 sse4_2 x2apic movbe popcnt tsc_deadline_timer aes xsave avx f16c rdrand hypervisor lahf_lm abm 3dnowprefetch invpcid_single ssbd ibrs ibpb stibp ibrs_enhanced fsgsbase tsc_adjust bmi1 avx2 smep bmi2 erms invpcid avx512f avx512dq rdseed adx smap avx512ifma clflushopt clwb avx512cd sha_ni avx512bw avx512vl xsaveopt xsavec xgetbv1 xsaves wbnoinvd ida arat avx512vbmi pku ospke avx512_vbmi2 gfni vaes vpclmulqdq avx512_vnni avx512_bitalg tme avx512_vpopcntdq rdpid md_clear flush_l1d arch_capabilities
bugs : spectre_v1 spectre_v2 spec_store_bypass swapgs mmio_stale_data eibrs_pbrsb
bogomips : 5799.94
clflush size : 64
cache_alignment : 64
address sizes : 46 bits physical, 48 bits virtual
power management:
This machine is clearly 100% allocated only for us and I can see how my code uses all available CPU resources:


It's clearly AWS EC2 instance but we can try getting more information about instance type using metadata query:
curl http://169.254.169.254/latest/meta-data/
Let's get instance type:
curl http://169.254.169.254/latest/meta-data/instance-type
m6i.xlarge

And you can find information about it at AWS web site. 

Let's investigate ARM Large VMs.

It's clearly AWS too.

CPU information:

cat /proc/cpuinfo 

processor : 0

BogoMIPS : 243.75

Features : fp asimd evtstrm aes pmull sha1 sha2 crc32 atomics fphp asimdhp cpuid asimdrdm lrcpc dcpop asimddp ssbs

CPU implementer : 0x41

CPU architecture: 8

CPU variant : 0x3

CPU part : 0xd0c

CPU revision : 1

lscpu:

Architecture:                    aarch64

CPU op-mode(s):                  32-bit, 64-bit

Byte Order:                      Little Endian

CPU(s):                          4

On-line CPU(s) list:             0-3

Thread(s) per core:              1

Core(s) per socket:              4

Socket(s):                       1

NUMA node(s):                    1

Vendor ID:                       ARM

Model:                           1

Model name:                      Neoverse-N1

Stepping:                        r3p1

BogoMIPS:                        243.75

L1d cache:                       256 KiB

L1i cache:                       256 KiB

L2 cache:                        4 MiB

L3 cache:                        32 MiB

NUMA node0 CPU(s):               0-3

Vulnerability Itlb multihit:     Not affected

Vulnerability L1tf:              Not affected

Vulnerability Mds:               Not affected

Vulnerability Meltdown:          Not affected

Vulnerability Mmio stale data:   Not affected

Vulnerability Retbleed:          Not affected

Vulnerability Spec store bypass: Mitigation; Speculative Store Bypass disabled via prctl

Vulnerability Spectre v1:        Mitigation; __user pointer sanitization

Vulnerability Spectre v2:        Mitigation; CSV2, BHB

Vulnerability Srbds:             Not affected

Vulnerability Tsx async abort:   Not affected

Flags:                           fp asimd evtstrm aes pmull sha1 sha2 crc32 atomics fphp asimdhp cpuid asimdrdm lrcpc dcpop asimddp ssbs

We can retrieve EC2 instance type using metadata query:
curl http://169.254.169.254/latest/meta-data/instance-type
m6g.xlarge

It's AWS Graviton2 based instance and you can find more details here

For full review we can try GCE enabled VM type which can be requested using Android Machine images. 

CPU:

processor : 0
vendor_id : GenuineIntel
cpu family : 6
model : 63
model name : Intel(R) Xeon(R) CPU @ 2.30GHz
stepping : 0
microcode : 0xffffffff
cpu MHz : 2299.998
cache size : 46080 KB
physical id : 0
siblings : 4
core id : 0
cpu cores : 2
apicid : 0
initial apicid : 0
fpu : yes
fpu_exception : yes
cpuid level : 13
wp : yes
flags : fpu vme de pse tsc msr pae mce cx8 apic sep mtrr pge mca cmov pat pse36 clflush mmx fxsr sse sse2 ss ht syscall nx pdpe1gb rdtscp lm constant_tsc rep_good nopl xtopology nonstop_tsc cpuid tsc_known_freq pni pclmulqdq vmx ssse3 fma cx16 pcid sse4_1 sse4_2 x2apic movbe popcnt aes xsave avx f16c rdrand hypervisor lahf_lm abm invpcid_single pti ssbd ibrs ibpb stibp tpr_shadow flexpriority ept vpid fsgsbase tsc_adjust bmi1 avx2 smep bmi2 erms invpcid xsaveopt arat md_clear arch_capabilities
bugs : cpu_meltdown spectre_v1 spectre_v2 spec_store_bypass l1tf mds swapgs
bogomips : 4599.99
clflush size : 64
cache_alignment : 64
address sizes : 46 bits physical, 48 bits virtual
power management:
Then retrieve instance type using GCE metadata API:
curl "http://metadata.google.internal/computeMetadata/v1/instance/machine-type" -H "Metadata-Flavor: Google"; echo -e "\n"
projects/1027915545528/machineTypes/n1-standard-4

It's n1-standard-4 and you can find official documentation about it here

Data as table:

  • Machine Linux large: AWS EC2 m6i.xlarge
  • Machine Linux large / Android image:  GCE n1-standard-4
  • ARM Linux Large: AWS EC2 m6g.xlarge

I'll do performance comparisons between Docker and VMs in future posts. 


Wednesday, 11 January 2023

USB-3 Gigabit 1G Ethernet card

I'm playing with my SBC Rock64Pro and found myself limited by single Ethernet port.

So I decided to find decent Ethernet adapter with USB-3 support.

Fortunately, I found really nice blog which compares performance between Realtek RTL8153 based USB Ethernet adapters and ASIX AX88179 based ones.

Realtek one clearly wins as ASIX shows not very perfect performance and cannot reach 1G in many tests. 

Just for clarity RockPro64 uses RTL8211F based adaptor for onboard ethernet. 


Saturday, 31 December 2022

NAT64 on Debian 12 Bookworm box

Want to be among leading engineers testing IPv6 protocol by disabling IPv4 completely for your PC or laptop but keeping access to obsoleted IPv4 based Internet? 


That's pretty simple and can be accomplished by using NAT64. 

I'll use Debian 12 on my SBC board as server and Ubuntu 22.04 as client. 

First of all you will need to install your own Recursive DNS server. You may use cloud DNS offerings for NAT64 but you still need server for NAT translations and there are no reasons to leak your personal browsing to companies and countries with weak data protection policies. 

I used Unbound for my setup and you can use any other guide.

To enable DNS64 you just need to make few configuration changes for module config:

module-config: "dns64 validator iterator"

And then manually add prefix for DNS64:

# DNS64 prefix for NAT64:

dns64-prefix: 64:ff9b::/96

Then you need to install Tayga and configure it.

Install is simple:
sudo apt install -y tayga

Configuration is relatively easy too:

sudo vim /etc/tayga.conf 

And then add following (you will need to replace xx by actual IP addresses of your NAT64 server):

tun-device nat64

# TAYGA's IPv4 address

ipv4-addr 192.168.1.xx

# TAYGA's IPv6 address

ipv6-addr XXXX

# The NAT64 prefix.

prefix 64:ff9b::/96

# Dynamic pool prefix, not clear what is it

dynamic-pool 192.168.255.0/24

# Persistent data storage directory

data-dir /var/spool/tayga

 Then apply configuration and enable auto-start:

sudo systemctl restart tayga

sudo systemctl enable tayga

This machine will work as router and we will need to enable forwarding for Linux kernel:
echo -e "net.ipv4.ip_forward=1\nnet.ipv6.conf.all.forwarding=1" | sudo tee /etc/sysctl.d/98-enable-forwarding.conf

And then apply these changes:

sudo sysctl --system 

Then create iptables rules for NAT:

sudo iptables -t nat -A POSTROUTING -o nat64 -j MASQUERADE

sudo iptables -t nat -A POSTROUTING -s 192.168.255.0/24 -j MASQUERADE 

Then I can recommend installing iptables-persistent. It will ask you to save your current confdiguration into file and you will need to confirm it:
sudo apt install -y iptables-persistent
After making all these changes I recommend doing full reboot for server to confirm that all daemons started on boot.

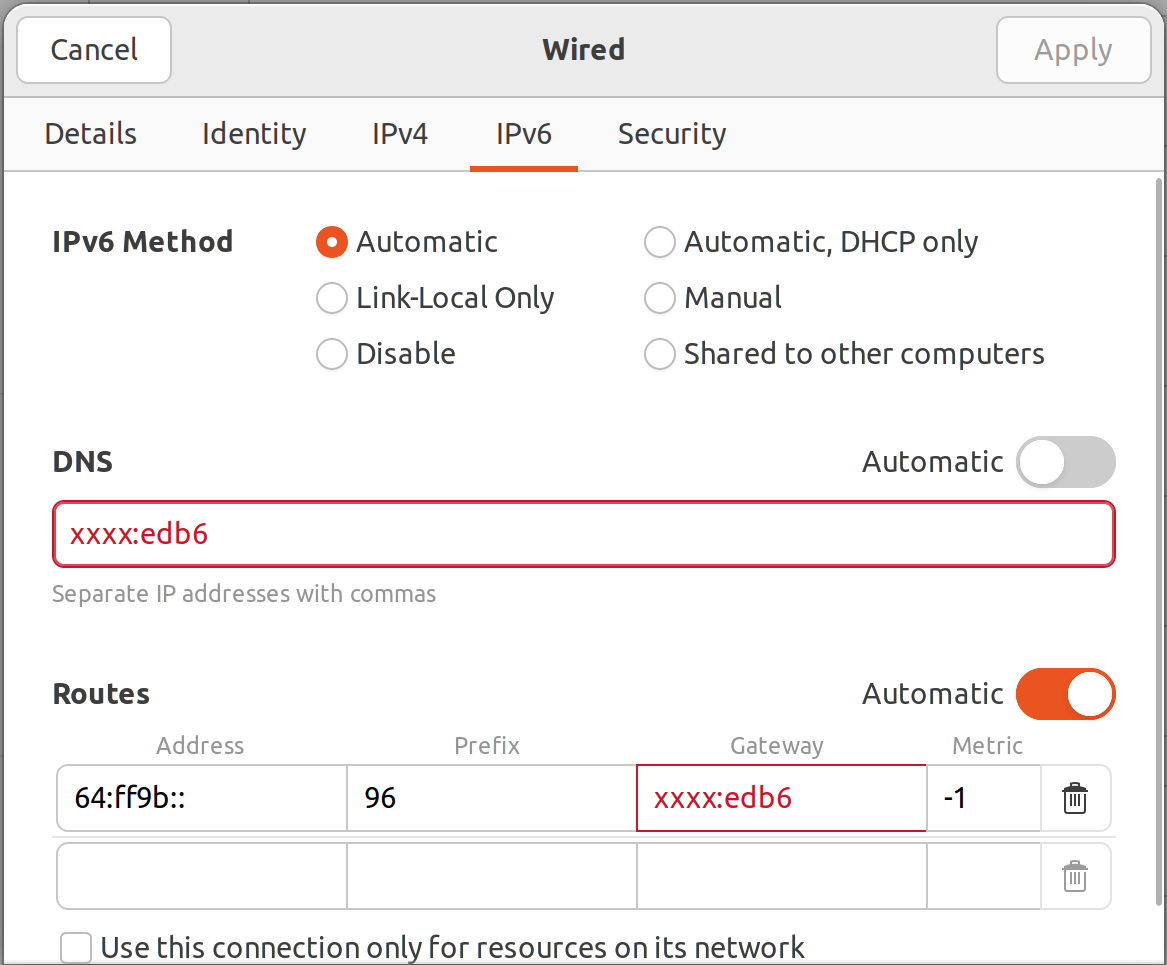
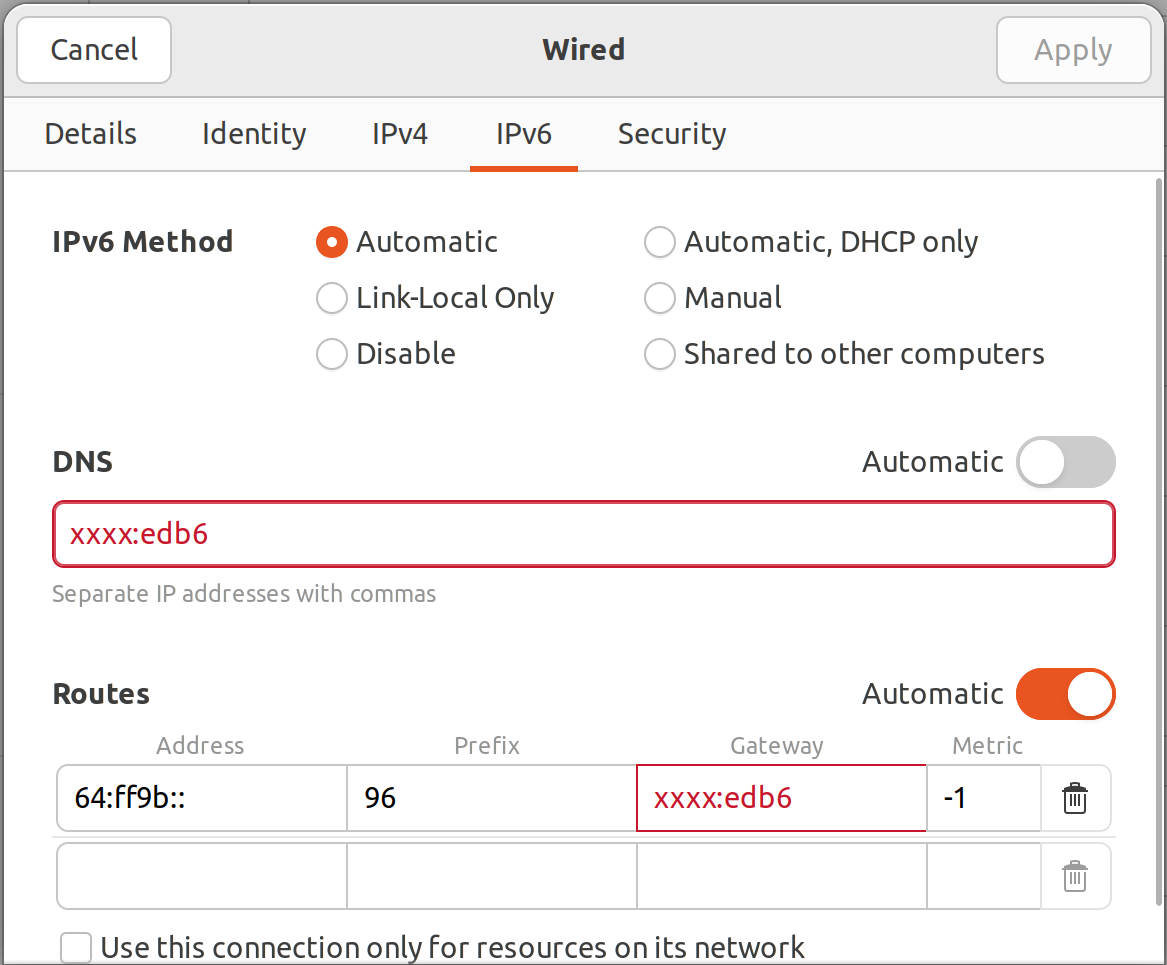
After that you need to change configuration for client machine in network manager (yes, using UI) that way:
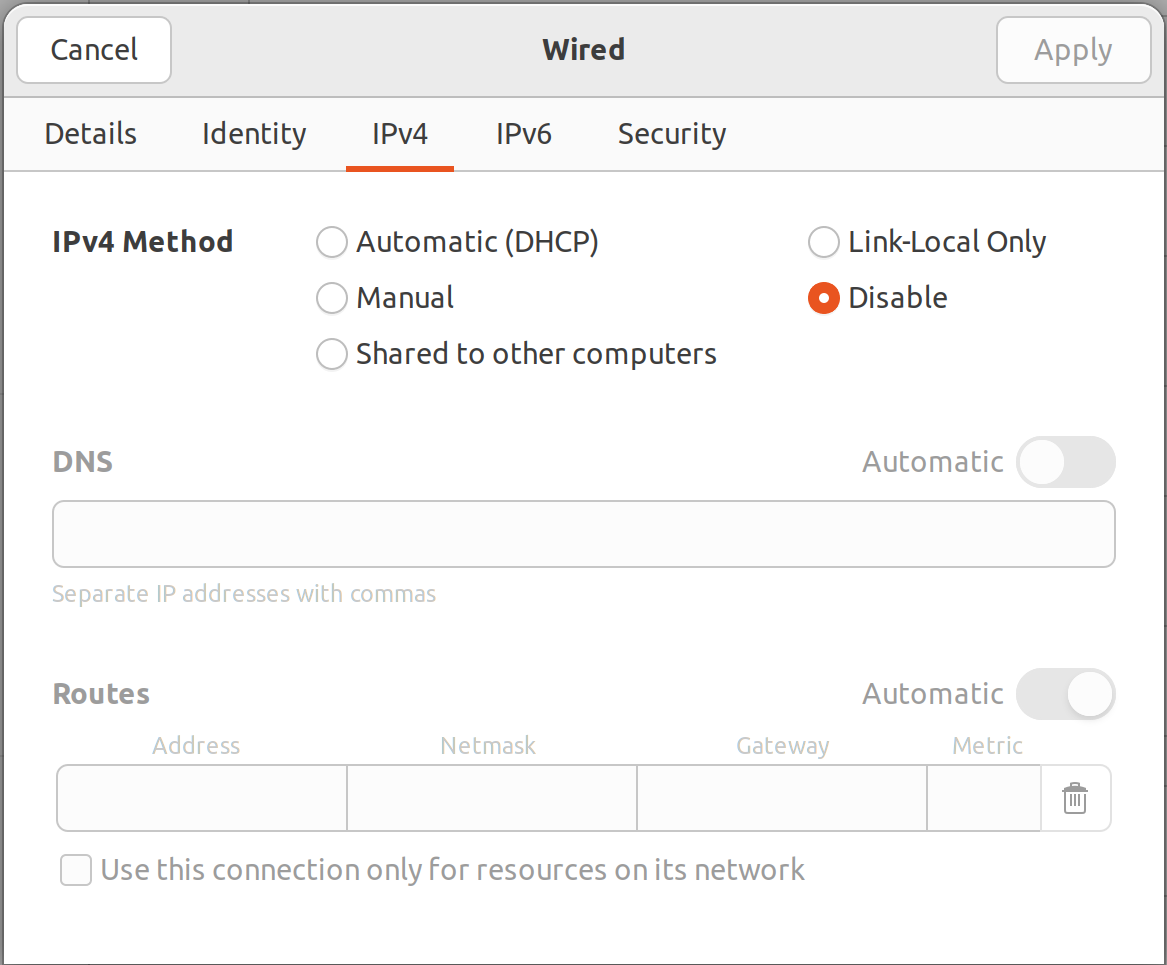
After that you can finally try disabling IPv4 this way:


And checking access to some IPv4 only site like github.com

Congrats! You may face some issues as some apps may not work and you will need to investigate root cause and kindly ask service provider to fix it. 

My guide was based on this one.

I have reworked this article and published it on my new blog.


IPv6 friendly Unbound configuration for home DNS recursor on SBC

I recently discovered how unfriendly is Unbound configuration for Debian installations. I had to spent few hours to craft my own configuration for it and put it to /etc/unbound/unbound.conf.d/recursor.conf. 

This configuration has preference to use IPv6 for DNS lookup when possible. 

Tuesday, 27 December 2022

Installing Debian 12 Bookworm RockPro64 on NVME

For few last days I've been playing with RockPro64 in attempts to install standard upstream Debian Bookworm on it using standard Debian installer and I succeeded.

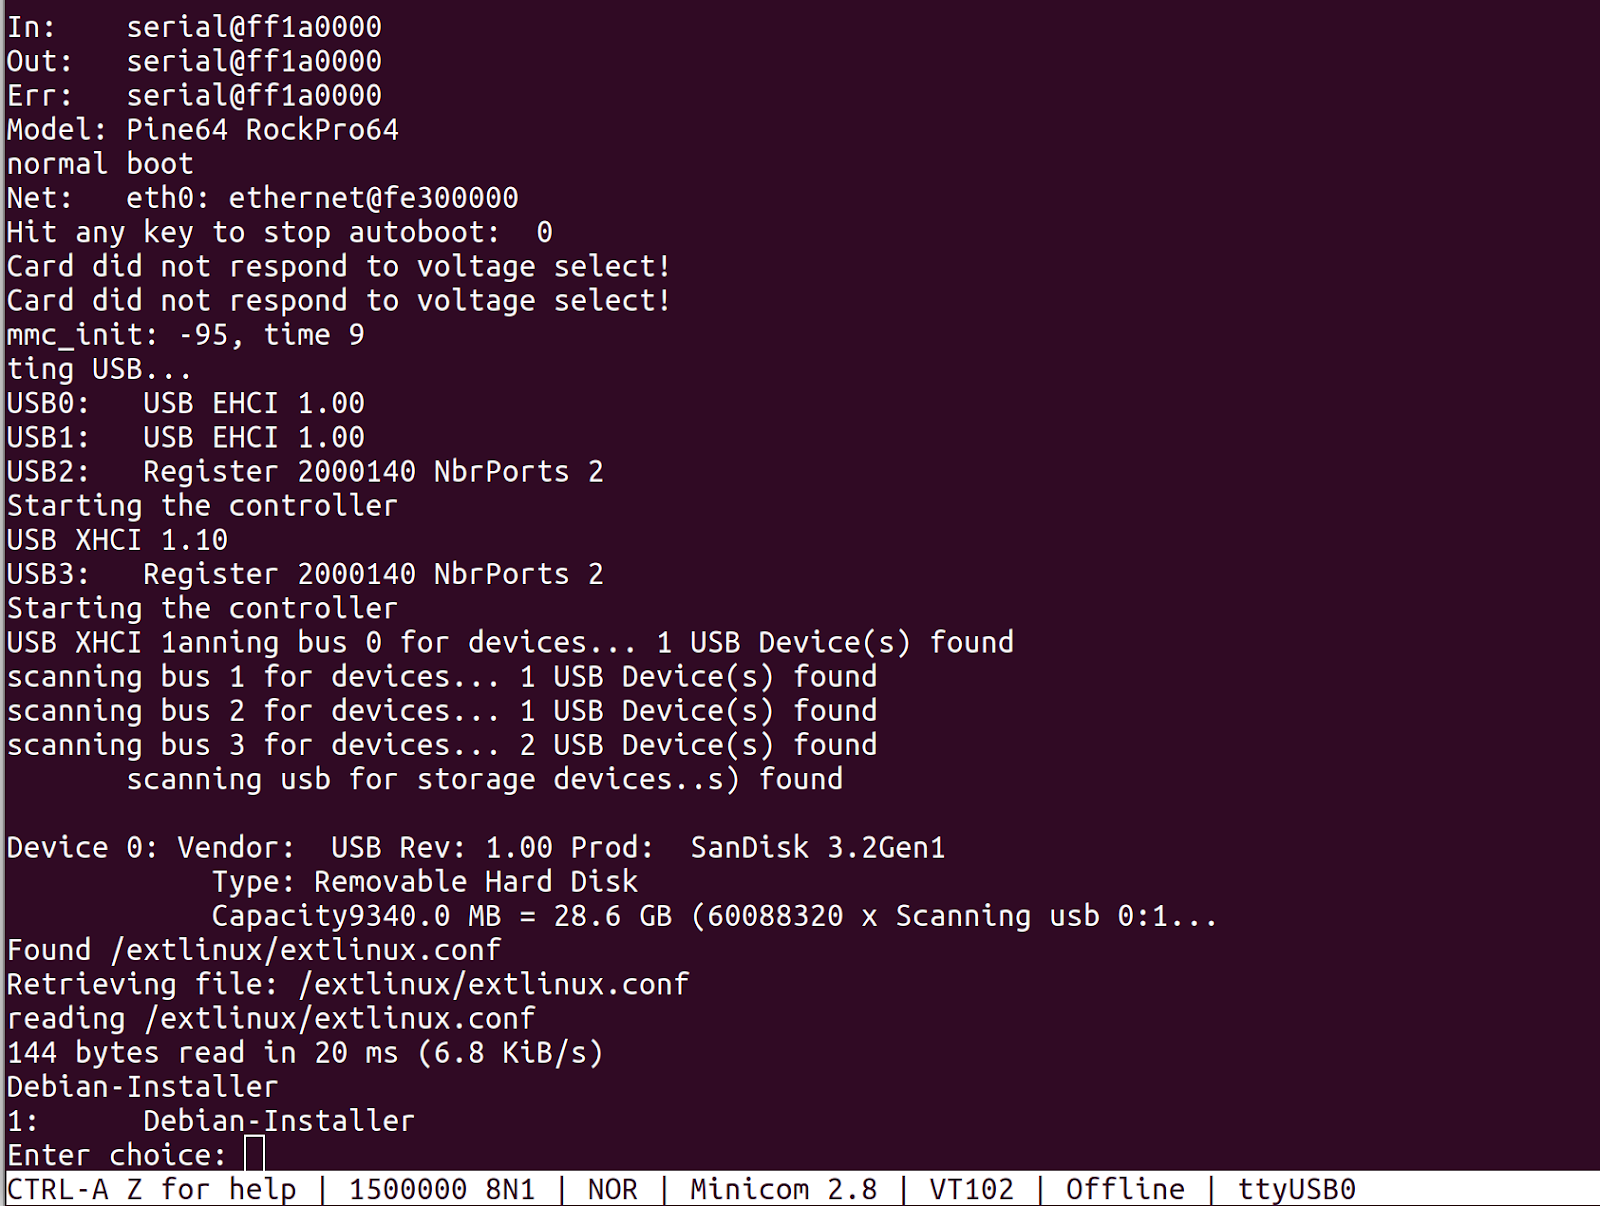
To accomplish it I used custom U-Boot to run Debian installer from USB stick:

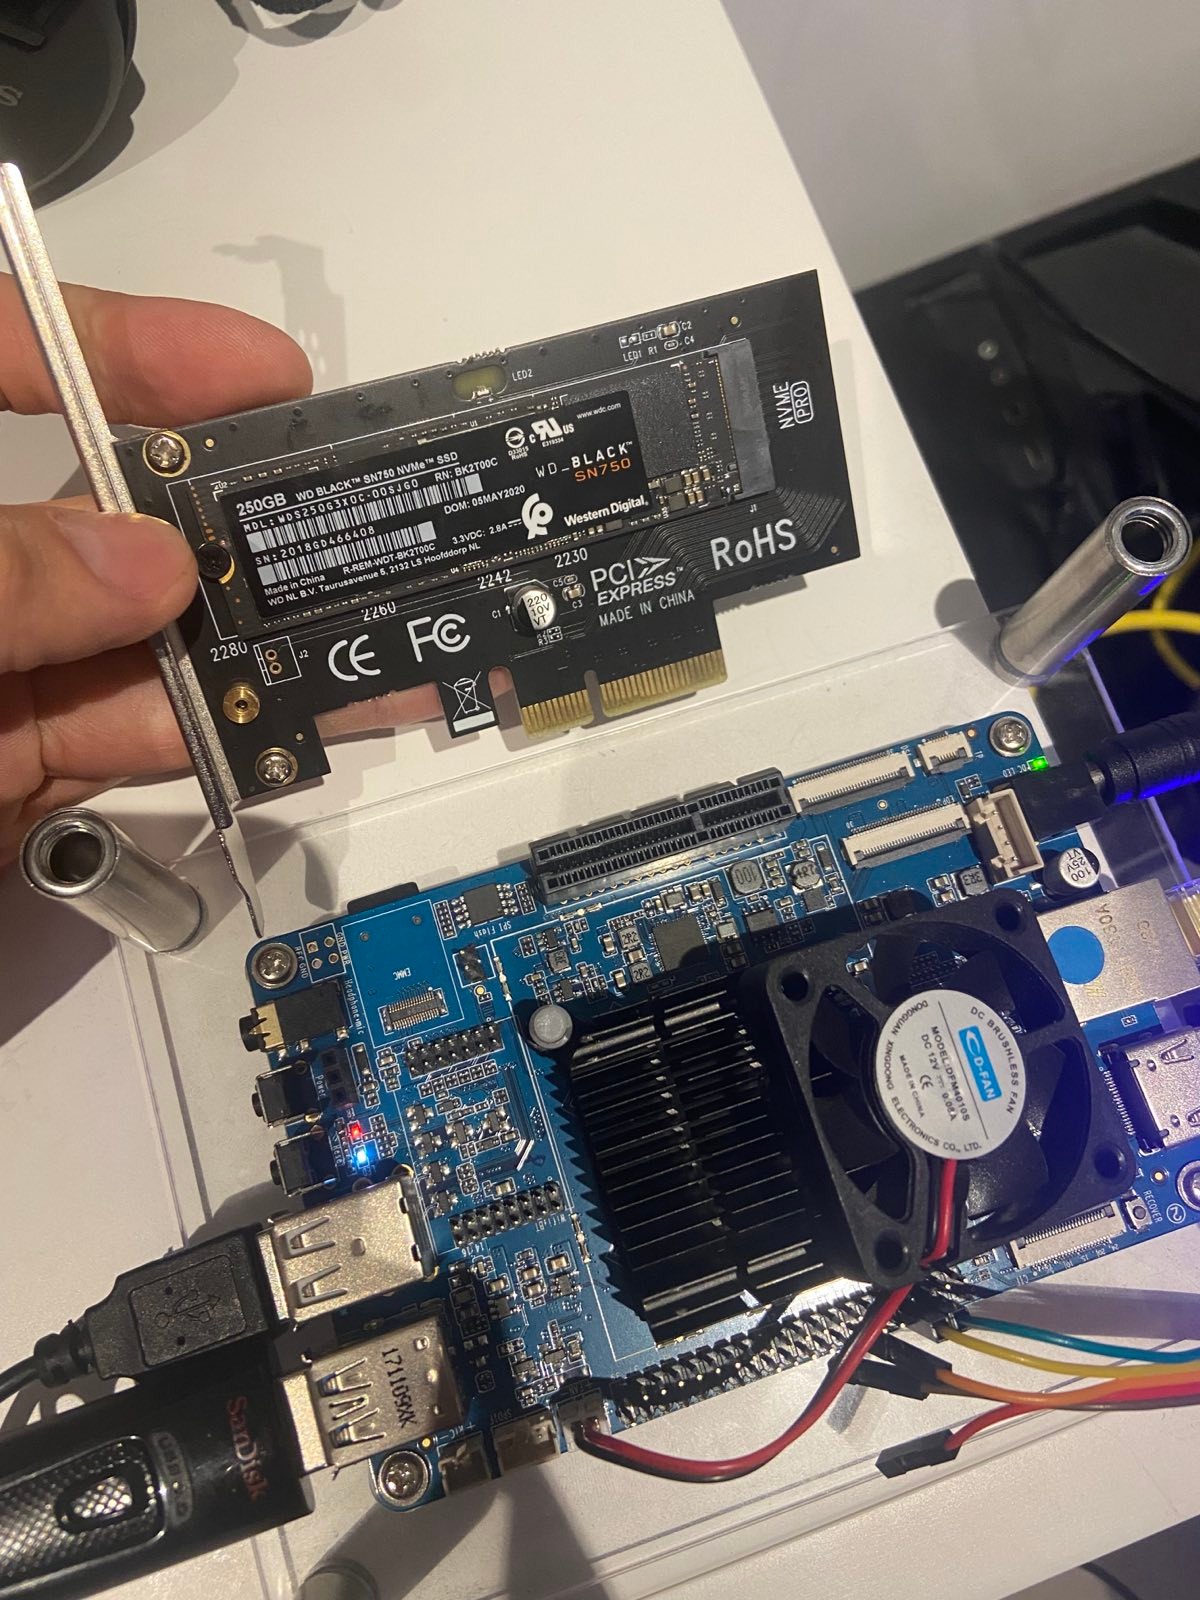
I used PCI-E adaptor for NVME WD Black SN 750 250G:


One of the main tricks was to install /boot partition on SD card this way from Debian Installer:


As you can see I used ext2 partition on SD card for /boot partition. It does not cause any performance issues and significantly simplifies our lives.

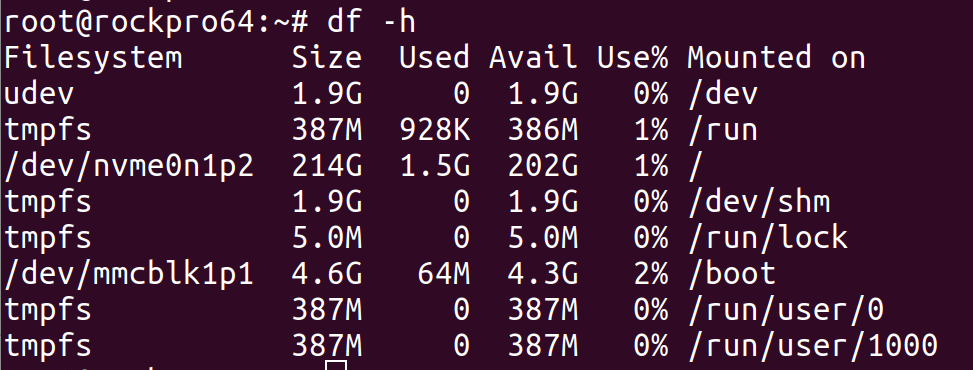
Finally, I got completely working Debian using upstream / vanilla Debian installer:


Previously I tried using U-Boot in SPI with USB boot support but it was unable to start from my USB-3 SSD / SATA disk for some reasons. I think it was some kind of issue with Debian installer as installation on USB is quite unusual and I do not blame it for failing.

Running RockPro64 from NVME is tricky too and I had no U-Boot with such capability to flesh SPI with it.

What is the point to use NVME? Look, perfornance.

Compare SD performance:
dd if=/dev/mmcblk1 of=/dev/null bs=1M count=10000 iflag=direct
10000+0 records in
10000+0 records out
10485760000 bytes (10 GB, 9.8 GiB) copied, 454.419 s, 23.1 MB/s

With NVME:
dd if=/dev/nvme0n1p2 of=/dev/null bs=1M count=10000 iflag=direct
10000+0 records in
10000+0 records out
10485760000 bytes (10 GB, 9.8 GiB) copied, 15.994 s, 656 MB/s

With SATA SSD attached via USB-3 adaptor:

sudo dd if=/dev/sda of=/dev/null bs=1M count=10000 iflag=direct
10000+0 records in
10000+0 records out
10485760000 bytes (10 GB, 9.8 GiB) copied, 32.7685 s, 320 MB/s


Boot RockPro64 from USB or PXE

By default RockPro64 can boot only from SD or eMMC card. So if you're looking for alternative options then you need to install U-Boot into bundled SPI memory using this guide.

You need to be extremely cautious and do not interrupt procedure after it started. It need around few minutes to finish.


After that you need to wait for text "SF: ... bytes @ 0x8000 Written: OK" and then wait little bit more until white led on board starts blinking with 1 second interval. It may mean that process finished. 

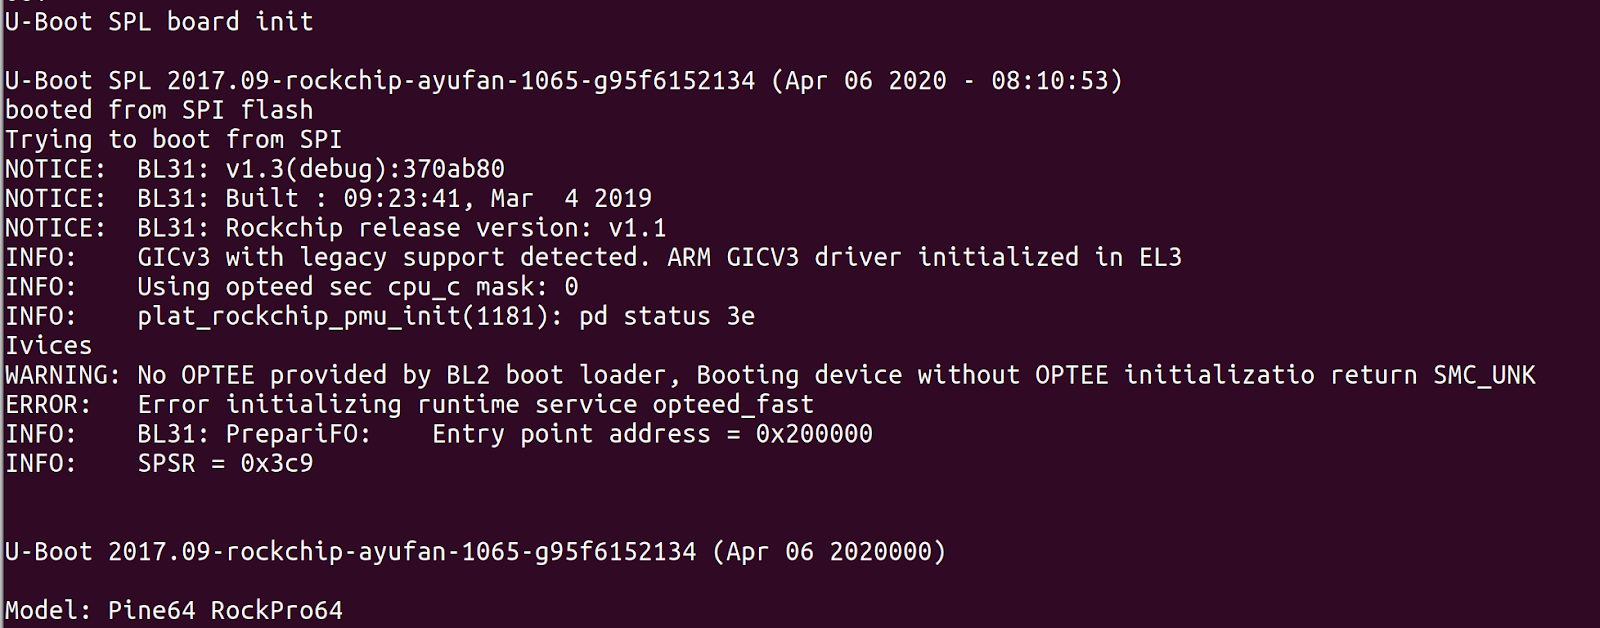
Then you can power it off and remove SDcard and start normal boot procedure and in this case it will load U-Boot from SPI memory:


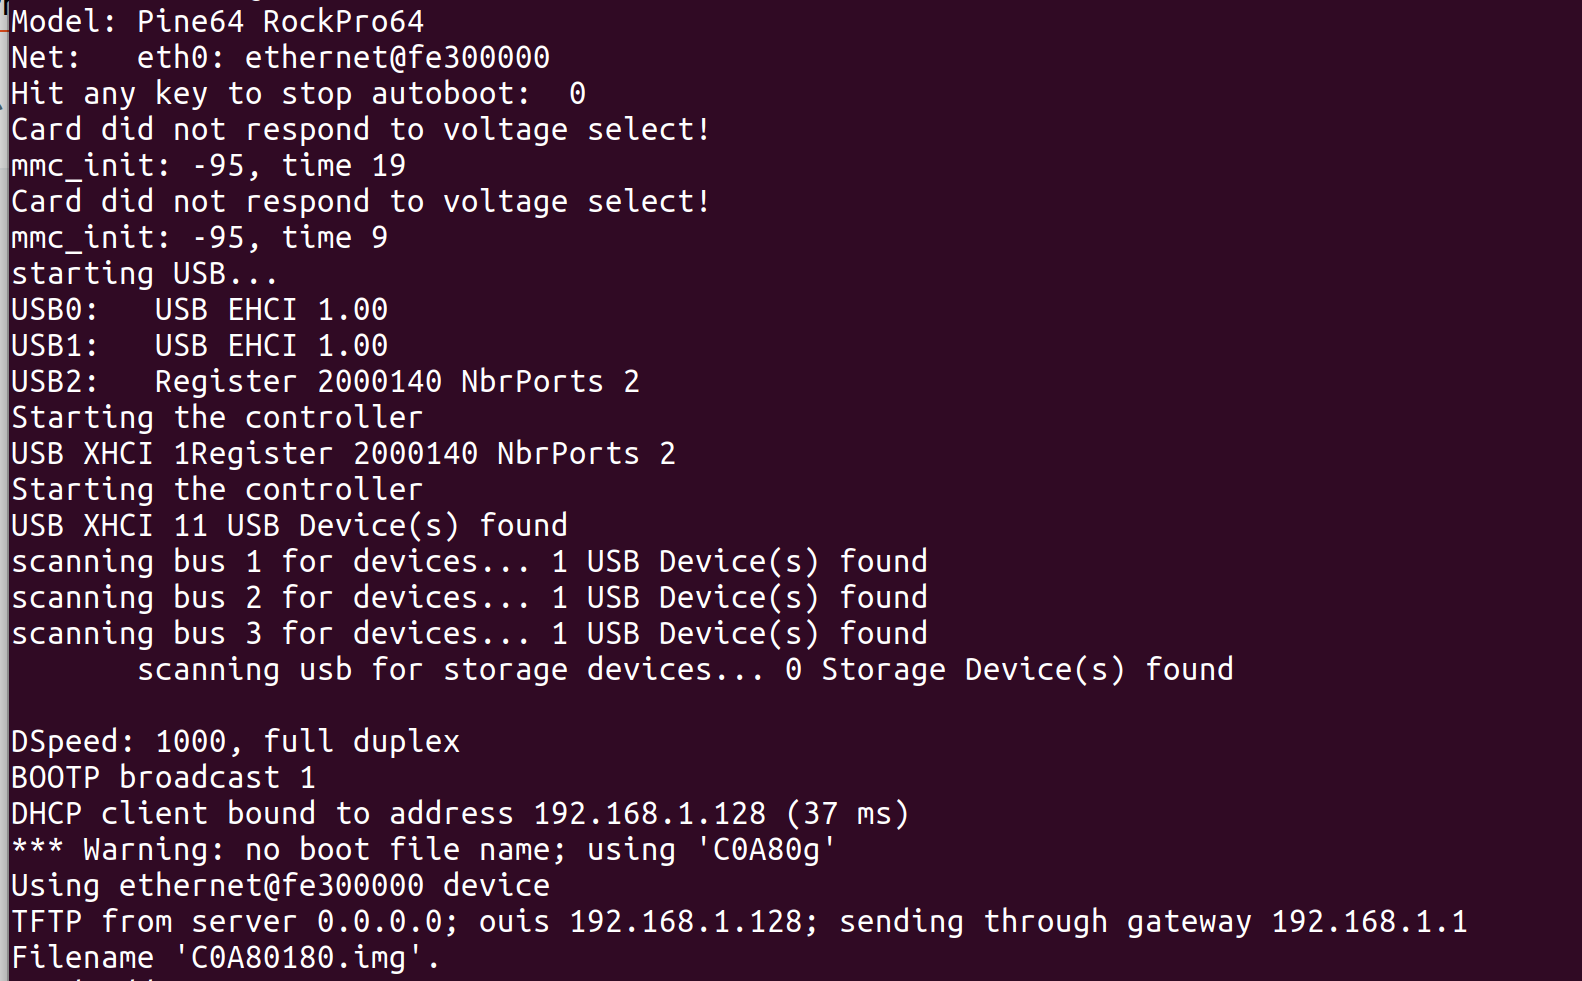
It will try checking your USB devices and then will try to boot from PXE:


You can easily check that it works fine by using bootable USB stick with Linux and it was very successful in my case:


In case of RockPro64 you can create bootable USB using official Debian images for RockPro64.