I found this guide and it looks easy and clear.
FastNetMon

Friday, 6 September 2024


Tuesday, 30 July 2024
Broken screen sharing in Google Meet (Chrome and Firefox) and Zoom on Ubuntu 24.04
Today I had very embarrassing experience as my screen sharing option failed during call.
Firefox version: Mozilla Firefox 128.0.3
Chromium 126.0.6478.182 snap
Zoom: 6.1.6.1013
When I opened sharing option and clicked whole screen then nothing happened:

After pretty much cursing I found traces of issue in Chrome log:
[11042:11042:0730/140758.199500:ERROR:screen_capture_portal_interface.cc(48)] Failed to request session: GDBus.Error:org.freedesktop.DBus.Error.UnknownMethod: No such interface “org.freedesktop.portal.ScreenCast” on object at path /org/freedesktop/portal/desktop[11042:11042:0730/140758.199528:ERROR:base_capturer_pipewire.cc(81)] ScreenCastPortal failed: 3
Which led me to solution:
sudo apt install xdg-desktop-portal-gnome gnome-remote-desktop
NB! You will need to restart machine.
The weirdest part that I never had this package before:
cat /var/log/dpkg.log|grep xdg-desktop-portal-gnome2024-07-30 14:09:09 install xdg-desktop-portal-gnome:amd64 <none> 46.2-0ubuntu12024-07-30 14:09:09 status half-installed xdg-desktop-portal-gnome:amd64 46.2-0ubuntu12024-07-30 14:09:09 status unpacked xdg-desktop-portal-gnome:amd64 46.2-0ubuntu12024-07-30 14:09:09 configure xdg-desktop-portal-gnome:amd64 46.2-0ubuntu1 <none>2024-07-30 14:09:09 status unpacked xdg-desktop-portal-gnome:amd64 46.2-0ubuntu12024-07-30 14:09:09 status half-configured xdg-desktop-portal-gnome:amd64 46.2-0ubuntu12024-07-30 14:09:09 status triggers-awaited xdg-desktop-portal-gnome:amd64 46.2-0ubuntu12024-07-30 14:09:09 status installed xdg-desktop-portal-gnome:amd64 46.2-0ubuntu1
The root cause of this issue is related with Wayland and as easier workaround you may consider switching to X11 session if this solution does not work.
More details: here
And there is a nice site to check sharing.
Monday, 1 July 2024
Saturday, 2 March 2024
How to create bootable USB for Windows 2022 server on Ubuntu 22.04
NB! Sadly this guide below did not work on my system (apparently because it's not very recent system) and I decided to use WoeUSB instead.
It's very easy to use:
sudo ./woeusb-5.2.4.bash --device ~/Documents/Window/SERVER_EVAL_x64FRE_en-us.iso /dev/sdX
Please note that it will overwrite all data on USB stick.
Example output:
WoeUSB v5.2.4
==============================
Info: Mounting source filesystem...
Info: Wiping all existing partition table and filesystem signatures in /dev/sda...
/dev/sda: 8 bytes were erased at offset 0x00000200 (gpt): 45 46 49 20 50 41 52 54
/dev/sda: 8 bytes were erased at offset 0x729bffe00 (gpt): 45 46 49 20 50 41 52 54
/dev/sda: 2 bytes were erased at offset 0x000001fe (PMBR): 55 aa
/dev/sda: calling ioctl to re-read partition table: Success
Info: Ensure that /dev/sda is really wiped...
Info: Creating new partition table on /dev/sda...
Info: Creating target partition...
Info: Making system realize that partition table has changed...
Info: Wait 3 seconds for block device nodes to populate...
mkfs.fat 4.2 (2021-01-31)
mkfs.fat: Warning: lowercase labels might not work properly on some systems
Info: Mounting target filesystem...
Info: Copying files from source media...
Splitting WIM: 4127 MiB of 4127 MiB (100%) written, part 2 of 24%
Finished splitting "./sources/install.wim"
Info: Installing GRUB bootloader for legacy PC booting support...
Installing for i386-pc platform.
Installation finished. No error reported.
Info: Installing custom GRUB config for legacy PC booting...
Info: Done :)
Info: The target device should be bootable now
Info: Unmounting and removing "/tmp/woeusb-source-20240302-155025-Saturday.g0vizR"...
Info: Unmounting and removing "/tmp/woeusb-target-20240302-155025-Saturday.T2VU0b"...
Info: You may now safely detach the target device
As first step format USB stick by creating new GPT partition table on it:

Then create single partition on it using NTFS file system:

Then review changes:

After that you will see that this partition will be mounted in file manager:

After that download ISO image for Wndows 2022 server from official web site and click twice on downloaded ISO and it will be mounted too:

Then select all files from mounted ISO disk to mounted NTFS partition on USB disk:


Please be patient as unmount will take significant time:

Done!
Sunday, 21 January 2024
jTAG / UART / serial console access for ROCKPro64 with CH340 UART USB
I bought ROCKPro64 quite long time ago and it's still pretty good even in 2024. So I decided to install official Debian for it to use it for NAT64 gateway and home automation platform.
To install Debian I need console access as HDMI does not work until you install Linux Distro which supports it.
So I decided to play with serial port access. On SBC you need to plug 3 pins to Pi-2-bus with following order.

On CH340 you need to plug them in following order:

And yellow jumper need to be in 3V3 mode this way:

Then you need to plug CH341 to your PC and check that it recognised correctly in dmesg:
[ 6981.858478] usb 1-5: new full-speed USB device number 23 using xhci_hcd
[ 6982.107488] usb 1-5: New USB device found, idVendor=1a86, idProduct=7523, bcdDevice= 2.64
[ 6982.107492] usb 1-5: New USB device strings: Mfr=0, Product=2, SerialNumber=0
[ 6982.107494] usb 1-5: Product: USB Serial
[ 6982.120247] ch341 1-5:1.0: ch341-uart converter detected
[ 6982.134269] usb 1-5: ch341-uart converter now attached to ttyUSB0
It may not connect from first attempt but you can try it multiple times to get required results.
After that you can run screen or minicom on your Linux box:
screen /dev/ttyUSB0 1500000
And finally reboot SBC using power (keep it for 5+ seconds) or reset button and then you will see boot sequence:
Hit any key to stop autoboot: 1
switch to partitions #0, OK
Scanningmmc1:1...
Retrieving file: /extlinux/extlinux.conf
Enter choice: 1: Debian-Installer
Retrieving file: /initrd.gz
Retrieving file: /dtbs/rockchip/rk3399-rockpro64.dtb
Moving Image from 0x2080000 to 0x2200000, end=4050000
01f00000
Booting using the fdt blob at Loading Ramdisk to ef112000, OK
Loading Device Tree to 00000000ef0ff000, end 00000000ef111300OK
Starting kernel ...
My guide was based on this reference guide.
In some cases device may refuse loading when TXD cable is plugged and you will need temporarily unplug it.
Sunday, 15 October 2023
Using TP Link TL-SG108E web UI configuration tool on Ubuntu 22.04
My research was based on this great post from 2014.
This switch has UI which can be accessed via windows application and has UI which can be accessed via browser.
Just for entertaining purposes I decided to try Window app on my Ubuntu 22.04 Linux machine.
To do so I installed wine:
sudo apt install wine-development
Then I downloaded version v1.3.10, 2022-04-12 from TP Link web site and unpacked it:
wget https://static.tp-link.com/upload/software/2022/202204/20220412/Easy%20Smart%20Configuration%20Utility%20v1.3.10.0.zip
unzip "Easy Smart Configuration Utility v1.3.10.0.zip"
After that I was able to run installer:
wine Easy\ Smart\ Configuration\ Utility\ v1.3.10.0.exe
Installation was finished successfully and then all exe files were put to "~/.wine/drive_c/Program Files (x86)/TPLINK/EasySmartConfigurationUtility".
And I was able to run it from first attempt:
cd ~/.wine/drive_c/Program Files (x86)/TPLINK/EasySmartConfigurationUtility
wine Easy\ Smart\ Configuration\ Utility.jar
Unfortunately, it did not find switch:

echo 1 > /proc/sys/net/ipv4/ip_forwardiptables -t nat -A PREROUTING -p udp -d 255.255.255.255 --dport 29809 -j DNAT --to 192.168.1.201:29809
After that it worked just fine:

Yay! For some reasons DHCP did not work well and IP address wasn't changed. In this case UI tool solves one of the most annoying issues: IP address discovery.
I was able to change password to new one but everything else causes wine to crash:
0130:err:ole:com_get_class_object class {597d4fb0-47fd-4aff-89b9-c6cfae8cf08e} not registered
0130:err:ole:com_get_class_object no class object {597d4fb0-47fd-4aff-89b9-c6cfae8cf08e} could be created for context 0x1
0130:err:ole:com_get_class_object class {597d4fb0-47fd-4aff-89b9-c6cfae8cf08e} not registered
0130:err:ole:com_get_class_object no class object {597d4fb0-47fd-4aff-89b9-c6cfae8cf08e} could be created for context 0x1
#
# A fatal error has been detected by the Java Runtime Environment:
#
# EXCEPTION_ACCESS_VIOLATION (0xc0000005) at pc=0x6d2efe4d, pid=244, tid=304
#
# JRE version: 7.0_15-b03
# Java VM: Java HotSpot(TM) Client VM (23.7-b01 mixed mode windows-x86 )
# Problematic frame:
# C [glass.dll+0xfe4d] _Java_com_sun_glass_events_KeyEvent__1getKeyCodeForChar@12+0x134d
#
# Failed to write core dump. Minidumps are not enabled by default on client versions of Windows
#
# An error report file with more information is saved as:
# C:\Program Files (x86)\TPLINK\EasySmartConfigurationUtility\hs_err_pid244.log
#
# If you would like to submit a bug report, please visit:
# http://bugreport.sun.com/bugreport/crash.jsp
# The crash happened outside the Java Virtual Machine in native code.
# See problematic frame for where to report the bug.
#
0130:err:msvcrt:_invalid_parameter (null):0 (null): (null) 0
After reading the Internet I found that this exe file is in fact Java JAR file and I've tried running it using OpenJDK:
sudo apt install default-jre
Sadly it failed miserably:
java -jar Easy\ Smart\ Configuration\ Utility.exe
Error: JavaFX runtime components are missing, and are required to run this application
As final attempt I've tried using Java from Oracle directly. You need to download it manually and then unpack it:
sudo tar -xf jre-8u381-linux-i586.tar.gz -C /opt
And run:
/opt/jre1.8.0_381/bin/java -jar Easy\ Smart\ Configuration\ Utility.exe
Sadly it failed too:
Exception in thread "main" java.lang.reflect.InvocationTargetException
at sun.reflect.NativeMethodAccessorImpl.invoke0(Native Method)
at sun.reflect.NativeMethodAccessorImpl.invoke(NativeMethodAccessorImpl.java:62)
at sun.reflect.DelegatingMethodAccessorImpl.invoke(DelegatingMethodAccessorImpl.java:43)
at java.lang.reflect.Method.invoke(Method.java:498)
at sun.launcher.LauncherHelper$FXHelper.main(LauncherHelper.java:904)
Caused by: java.lang.UnsupportedOperationException: Internal Error
at com.sun.glass.ui.gtk.GtkApplication.lambda$new$5(GtkApplication.java:158)
at java.security.AccessController.doPrivileged(Native Method)
at com.sun.glass.ui.gtk.GtkApplication.<init>(GtkApplication.java:140)
at com.sun.glass.ui.gtk.GtkPlatformFactory.createApplication(GtkPlatformFactory.java:41)
at com.sun.glass.ui.Application.run(Application.java:147)
at com.sun.javafx.tk.quantum.QuantumToolkit.startup(QuantumToolkit.java:279)
at com.sun.javafx.application.PlatformImpl.startup(PlatformImpl.java:211)
at com.sun.javafx.application.LauncherImpl.startToolkit(LauncherImpl.java:675)
at com.sun.javafx.application.LauncherImpl.launchApplicationWithArgs(LauncherImpl.java:337)
at com.sun.javafx.application.LauncherImpl.launchApplication(LauncherImpl.java:328)
... 5 more
You may try running older version of Oracle Java as bundled JRE is dated by 2013:
root@station:/home/pavel/.wine/drive_c/Program Files (x86)/TPLINK/EasySmartConfigurationUtility/jre# head COPYRIGHT
Copyright � 1993, 2013, Oracle and/or its affiliates.
All rights reserved.
This software and related documentation are provided under a
license agreement containing restrictions on use and
disclosure and are protected by intellectual property laws.
Except as expressly permitted in your license agreement or
allowed by law, you may not use, copy, reproduce, translate,
broadcast, modify, license, transmit, distribute, exhibit,
perform, publish, or display any part, in any form, or by
root@station:/home/pavel/.wine/drive_c/Program Files (x86)/TPLINK/EasySmartConfigurationUtility/jre# cat release
JAVA_VERSION="1.7.0"
OS_NAME="Windows"
OS_VERSION="5.1"
OS_ARCH="i586"
SOURCE=" .:f37a75bd3959 corba:e5b996dabec6 deploy:3bb10c0238fe hotspot:5b55cef461b0 hotspot/src/closed:759fc4d1d429 hotspot/test/closed:2d8e36f71952 install:0154bd493323 jaxp:a55f67cfe182 jaxws:eaf9b2990670 jdk:87e45d30e24d jdk/make/closed:b83ea3e4144a jdk/src/closed:d8651f160809 jdk/test/closed:7e4b15d6c1bb langtools:c160d7d1616d pubs:06f851196d93 sponsors:2dbf246921cb"
With IP address in hands I was able to access web UI:

And finally I can use capability for which this switch was bought - port mirror:

Saturday, 6 May 2023
Ubuntu 22.04 installation on VirtualBox using command line
We use VirtualBox for process of preparing VM images for our product. Sadly some things had to be done manually and we're heading towards full automation and it was an attempt to prepare VM for Ubuntu 22.04 installation from ISO using only command line interface.
NB! If you have IPv4 disabled on your machine you have to enable it as otherwise VM will not have connection and installer may fail.
Set some variables shared by next steps:
export VM_NAME=Ubuntu2204_TEST_OVA
export VM_ROOT_FOLDER="/home/pavel/VirtualBoxVMs"
export VM_FOLDER="$VM_ROOT_FOLDER/$VM_NAME"
By default VirtualBox uses path with nasty space in it and that's why I changed it to custom one without spaces as I do not like spaces and bash agrees with me about it.
Create VM and register it in VirtualBox:
VBoxManage createvm --name $VM_NAME --register --ostype=Ubuntu22_LTS_64 --basefolder=$VM_ROOT_FOLDER
If you plan to use another OS then you can get all list of all OS types using this command:
VBoxManage list ostypes
Then set some basic hardware options:
VBoxManage modifyvm $VM_NAME --ioapic on
VBoxManage modifyvm $VM_NAME --memory 16384 --vram 128
VBoxManage modifyvm $VM_NAME --cpus 8
VBoxManage modifyvm $VM_NAME --nic1 nat
Then create 150G disk for VM and attach it to it:
VBoxManage createhd --filename $VM_FOLDER/disk.vdi --size 150000 --format VDI
Add SATA controller:
VBoxManage storagectl $VM_NAME --name "SATA Controller" --add sata --controller IntelAhci
And attach our disk to it:
VBoxManage storageattach $VM_NAME --storagectl "SATA Controller" --port 0 --device 0 --type hdd --medium $VM_FOLDER/disk.vdi
Then add IDE controller to mount ISO disk with installer:
VBoxManage storagectl $VM_NAME --name "IDE Controller" --add ide --controller PIIX4
VBoxManage storageattach $VM_NAME --storagectl "IDE Controller" --port 1 --device 0 --type dvddrive --medium ~/Downloads/ubuntu-22.04.2-live-server-amd64.iso
VBoxManage modifyvm $VM_NAME --boot1 dvd --boot2 disk --boot3 none --boot4 none
Then you can run VM:
VBoxManage startvm $VM_NAME
Based on this guide.
Thursday, 4 May 2023
sign_and_send_pubkey: signing failed for RSA "PIV AUTH pubkey" from agent: agent refused operatio
This error is very annoying and it happens when you use Yubikey for ssh auth and by accident you did not click on Yubikey when you did ssh auth.
After this happens you need to restart machine or ssh agent and all the things to fix it.
When it happens I was able to catch this error log:
sudo systemctl status pcscd.service
● pcscd.service - PC/SC Smart Card Daemon
Loaded: loaded (/lib/systemd/system/pcscd.service; indirect; vendor preset: enabled)
Active: active (running) since Thu 2023-05-04 10:46:27 BST; 2h 39min ago
TriggeredBy: ● pcscd.socket
Docs: man:pcscd(8)
Main PID: 2505 (pcscd)
Tasks: 9 (limit: 38276)
Memory: 2.6M
CPU: 88ms
CGroup: /system.slice/pcscd.service
└─2505 /usr/sbin/pcscd --foreground --auto-exit
May 04 10:46:27 station systemd[1]: Started PC/SC Smart Card Daemon.
May 04 13:22:18 station pcscd[2505]: 00000000 ccid_usb.c:1566:InterruptStop() libusb_cancel_transfer failed: LIBUSB_ERROR_NO_DEVICE
Then I feed "ccid_usb.c:1566:InterruptStop() libusb_cancel_transfer failed: LIBUSB_ERROR_NO_DEVICE" to Google.
I have this issue on Ubuntu 22.04 and I've tried version from Ubuntu 22.10 which has version 1.99 of affected package and it did not help.
Apparently this bugfix may fix this issue and it wasn't part of 1.99 release. Related GitHub issue.
Monday, 1 May 2023
Can Mozilla VPN users connect Mullwad servers directly?
I've tried to fix my IPv6 compatibility issues by using Mozilla VPN over NAT64 box this way.
I've tried to improve this setup but it did not work as expected.
Mozilla VPN uses Mullwad internally and we can find Mullwad's server name using this interface. Just fill "us-nyc-wg-505" in hostname field and after that you will see something like: "us-nyc-wg-505.relays.mullvad.net".
With this information on our hands we can replace:
Endpoint = x.y.z.y:23662
To:
Endpoint = us-nyc-wg-505.relays.mullvad.net:23662
Sadly in my case this trick did not work ;(
If you have any advice about ways to fix it please share.
Mozilla VPN without UI on Ubuntu Linux 22.04 over NAT64
Mozilla VPN service is a really nice service but their UI does not support IPv6 only environment. I use NAT64 box in my network and it does not help either.
Sadly it's known bug and it's still here ;( Luckily I found nice way to workaround it using command line interface.
I found nice workaround
Install their Linux app as documented on web site.
Then we're going to use console app to authenticate. Start authentication process using:
mozillavpn login
Then check that you're successfully authenticated:
mozillavpn status
Then get list of all available servers:
mozillavpn servers
And select your favourite one:
mozillavpn select us-nyc-wg-505
Generate Wireguard configuration using wgconf option which was added recently:
mozillavpn wgconf > mozilla-vpn.conf
Optiwas added recently.
Then open mozilla-vpn.conf with editor and alter line like this:
Endpoint = x.y.z.y:23662
To:
Endpoint = 64:ff9b::x.y.z.y:23662
Then establish VPN:
wg-quick up mozilla-vpn.conf
To shutdown it you can use:
wg-quick down mozilla-vpn.conf
In this case we will use NAT64 gateway for connection.
Sunday, 30 April 2023
Yubikey ssh on Ubuntu 22.04
Today I did full fresh installation of Ubuntu 22.04 to migrate to new 2T NVME disk from Samsung as I had disk space issues with my old 500G drive.
After installation I noticed that I cannot use my Yubikey for ssh auth as documented here.
I tried to add Yubikey as auth source and it failed with pretty weird error:
ssh-add -s /usr/lib/x86_64-linux-gnu/opensc-pkcs11.so
Enter passphrase for PKCS#11:
Could not add card "/usr/lib/x86_64-linux-gnu/opensc-pkcs11.so": agent refused operation
This error can mean literally anything.
I've tried running ssh agent manually in foreground mode:
ssh-agent -d
And after that I saw error which sounds like "no available slots".
So I back to guide as I suspected that my Yubikey died and I've sued following command:
sudo ykman list --serials
WARNING: PC/SC not available. Smart card (CCID) protocols will not function.
ERROR: Unable to list devices for connection
1232134323
That's interesting and this error lead me to this bug and I got fix:
sudo systemctl start pcscd
After that it worked just fine.
As long term fix you need to enable automatic start on machine boot:
sudo systemctl enable pcscd
Sadly it's known Ubuntu bug.
Thursday, 13 April 2023
Yubikey ssh and signing failed for RSA "PIV AUTH pubkey" from agent: agent refused operation
You may face this issue if you use ssh and Yubikey like covered in this guide.
Previously I had to reboot machine to address this issue but I found nice trick to get it work.
Originally error looks like:
ssh serversign_and_send_pubkey: signing failed for RSA "PIV AUTH pubkey" from agent: agent refused operationroot@xxx: Permission denied (publickey).
It may happen when you forgot to tap confirmation on Yubikey and it was just slow.
First attempt to fix it was to kill all ssh agent processes which may be run on system:
ps aux|grep ssh
odintsov 16493 0.0 0.0 7972 5820 ? S 12:36 0:00 /usr/bin/ssh-agent -D -a /run/user/1000/keyring/.ssh
odintsov 16494 0.0 0.0 164340 11584 ? SLl 12:36 0:00 /usr/lib/openssh/ssh-pkcs11-helper
odintsov 27798 0.0 0.0 7972 3848 ? Ss 13:20 0:00 ssh-agent -s
odintsov 27801 0.0 0.0 164340 11572 ? SLl 13:20 0:00 /usr/lib/openssh/ssh-pkcs11-helper
The best way to kill them is:
pkill ssh
After that we need to start ssh agent again:
eval `ssh-agent -s`
After that load Yubikey key to agent:
ssh-add -s /usr/lib/x86_64-linux-gnu/opensc-pkcs11.so
For last command I use fancy alias in ~/.bashrc:
alias ssh_add='ssh-add -s /usr/lib/x86_64-linux-gnu/opensc-pkcs11.so'
It's not clear why Yubikey fails that way. I think it has something to do with ssh-pkcs11-helper being stuck in operation to Yubikey hardware.
Saturday, 8 April 2023
How to enable IPv6 on Google Cloud?
Google Cloud has native support for IPv6 but you need to create special VPC network to use IPv6.
As first step open VPC configuration:
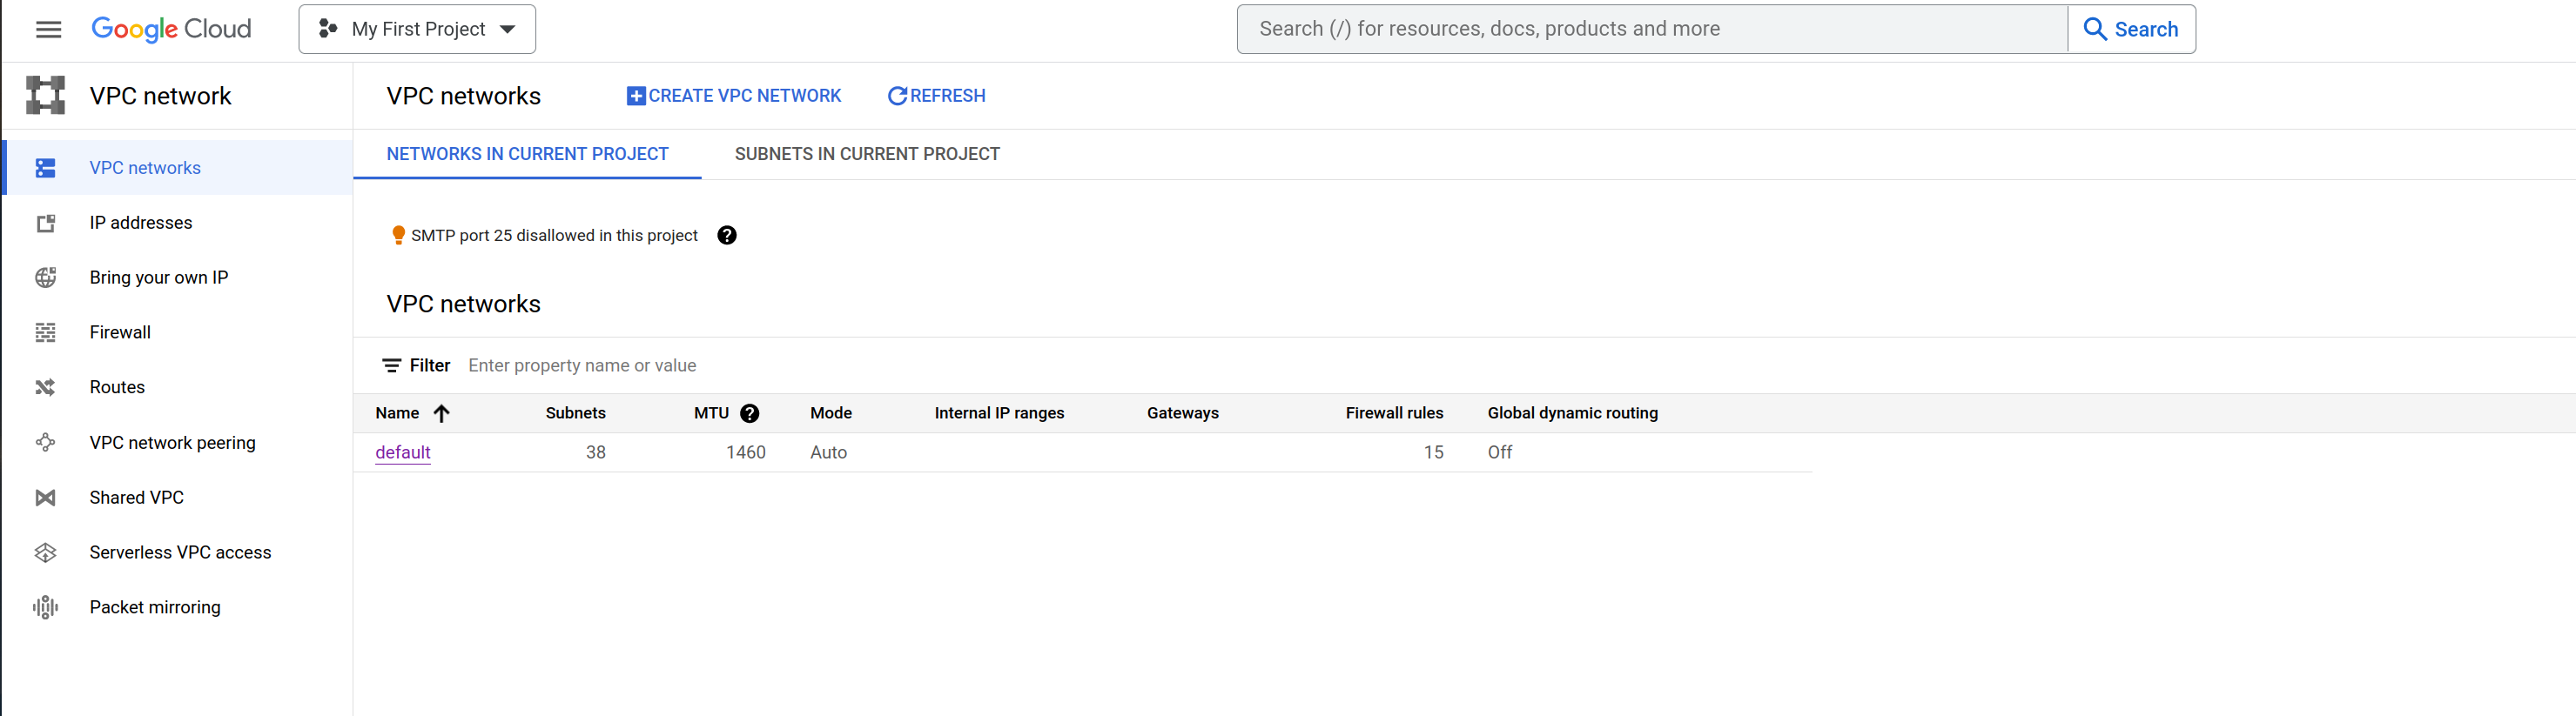
Then create new VPC network and fill all fields as on my screenshot.

Then configure subnet settings. The most important step to specify dual stack.

Then you need to create default firewall rules to allow ICMPv6. You may notice that we use number 58 instead of ICMPv6 due to following issue:

Then enable ssh:


And finally select dual stack:

The fun thing that you actually can disable IPv4 completely or you can allocate dedicated IPv6 address for machine.
Pricing for IPv6 addresses even static ones is mostly free:

Sunday, 2 April 2023
Building log4cpp 1.1.4rc3 on msys2 environment on Windows Server 2022
I got following error during my attempts to build lo4cpp in msys2 environment:
"../include/log4cpp/config-MinGW32.h:27:17: error: 'long long long' is too long for GCC"
It can be easily fixed by commenting following code in file include/log4cpp/config-MinGW32.h
// #define int64_t __int64
I'll try to report this issue to upstream to have it fixed.
Got this hint from this blog.
Enabling SSH server on Windows 2022 Datacenter edition
After friend's advice I realised that modern Windows versions have bundled SSH server and that's a best way to work with remote Windows platforms as RDP is not as cool as old good console.
First of all we need to install OpenSSH server component, you can do it this way:
- Start
- Settings
- Apps
- Apps and Features
- Optional Features
- Add Feature
- OpenSSH Server
Then we need to start it. Search for "Services" in search panel and then open it. Looks for OpenSSH SSH server and then click right mouse button and Start it.

Then open properties and switch startup type from "manual" to "automatic". We need it to launch it automatically on boot.

After that you can connect to this server via normal SSH client from Linux:

Based on this guide.
Subscribe to:
Posts
(
Atom
)